HubSpot Marketing Hub Onboarding
For effective HubSpot Marketing Hub Oboarding, it’s crucial to properly set up your account, configure essential tools, and become familiar with the platform’s core features. Here’s a step-by-step onboarding process that covers everything from initial setup to launching campaigns, aimed at helping new users quickly understand and utilize the power of HubSpot Marketing Hub.
Onboarding Process For HubSpot Marketing Hub
HubSpot’s Marketing Hub is an all-in-one platform designed to help businesses attract, engage, and delight their audiences through various marketing tools integrated into a single system. With capabilities spanning email marketing, content creation, social media management, automation, and in-depth analytics, Marketing Hub empowers users to streamline their marketing activities and create data-driven strategies.
1. Initial Setup and Account Configuration
Begin by creating an account on HubSpot’s website. Go to HubSpot and create an account. Once logged in, access the main dashboard where you can see your setup options. Once logged in, you’ll be directed to the main dashboard, which serves as the central hub for all of HubSpot’s marketing tools.
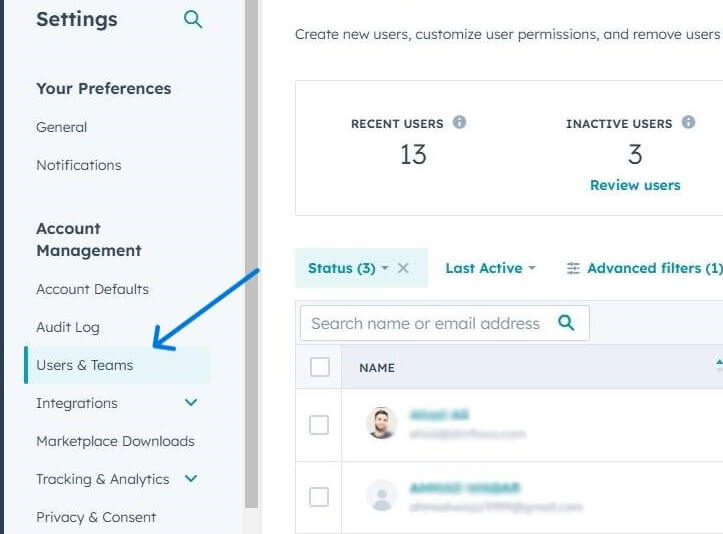
From here, navigate to the Settings section, where you can add your team members. You can do this by navigating to Settings > Users & Teams. Add team members, assign permissions, and specify roles according to each user’s function in your organization. Assigning permissions early helps ensure that everyone on your team has the appropriate level of access and responsibility within the platform.

Next, Under Settings > Content > Domains & URLs, click on “Connect Domain.” Follow prompts to integrate your website with HubSpot for tracking and analytics. This connection is crucial as it allows HubSpot to track visitor activity on your website and generate data for analytics and reporting.
2. Define Marketing Objectives and Tracking Setup
With your account configuration complete, set up tracking so that HubSpot can start gathering data about your audience. In Settings > Tracking & Analytics > Tracking Code, copy the code and paste it into your website’s header. This enables HubSpot to track visitor activity and data. This code is what enables HubSpot to monitor visitor interactions and provide insights on user behavior.
![]()
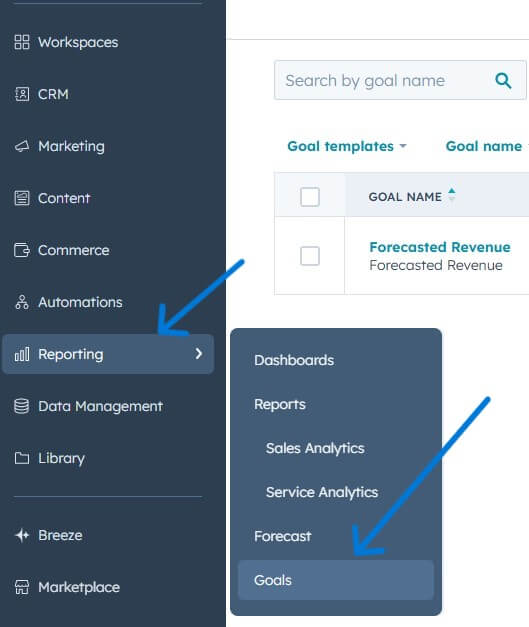 Once tracking is in place, it’s time to establish clear goals for your marketing efforts. Navigate to Reporting > Goals. Create measurable goals (e.g., website traffic, lead generation) based on your marketing objectives. Define KPIs to align with your business objectives.
You can define specific objectives, such as website traffic targets or lead generation numbers. By setting these goals, you’ll have measurable KPIs that align with your business objectives, allowing you to track progress effectively over time.
3. Database Setup for Contacts and Lists
With your HubSpot account configured and your goals in place, the next step is to build out your contact database. In CRM > Contacts > click “Import.” Upload a CSV of your contacts, mapping fields as needed. During the import process, map fields appropriately so that HubSpot can store the data correctly.

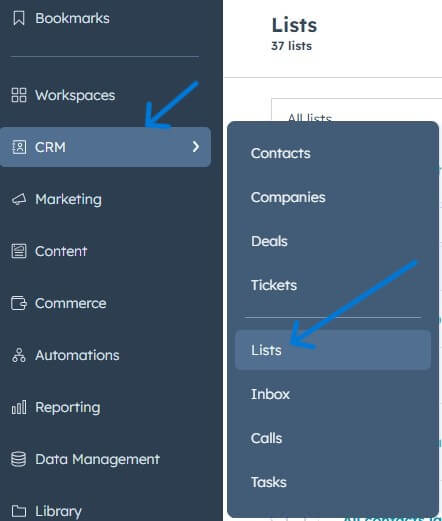 After your contacts are uploaded, organize them into segmented lists by navigating under CRM > Lists, build lists based on criteria like behavior, lead status, or demographics. This segmentation will help with targeted campaign creation. Creating segmented lists allows you to target specific groups with relevant messaging, ensuring that your marketing efforts are personalized and effective.
4. Email Marketing Setup
Once your contacts are imported and organized, you can set up your email marketing preferences. Under Marketing > Email > Settings, enter your email details. Configure details such as your email address and authenticate your domain to ensure that your emails have high deliverability rates.
After configuration, you’re ready to create and schedule your first email campaign. In Marketing > Email, click “Create Email” and use HubSpot’s email editor to design your email, adding in text, images, and call-to-action buttons to create an engaging message. Once you’re satisfied, schedule your email to be sent to your selected lists, allowing you to reach out to specific segments of your audience at the optimal time.
5. Content Creation and Lead Generation Tools
Now that your basic setup is complete, you can begin creating content and capturing leads. Start by setting up landing pages by navigating to Marketing > Landing Pages, click “Create.” Choose a template that fits your campaign, customize it with engaging text, and include calls to action to encourage conversions. Published landing pages serve as the primary tool for capturing leads and driving traffic.
Additionally, Under Marketing > Forms, create forms to capture lead information. Customize Marketing > CTAs for your calls to action on pages and emails. These forms and CTAs play a crucial role in lead generation by prompting users to take action, such as signing up for a newsletter or requesting more information.
6. Automated Workflow Setup
With lead generation tools in place, it’s time to automate certain processes to save time and nurture leads more effectively. Go to Automation > Workflows and click “Create Workflow.” Create an automated workflow by selecting a trigger event (like a form submission) and defining the actions that follow, such as sending a welcome email or tagging a contact.
Automated workflows allow you to engage with leads at various stages of the buyer’s journey without manual intervention. Once set up, activate the workflow to ensure that your lead-nurturing sequence is always working in the background.
7. Campaign and Ad Integration
Next, integrate your social media and advertising platforms to manage campaigns directly through HubSpot. In Marketing > Social and Marketing > Ads, connect your LinkedIn, Facebook, and other ad accounts to allow HubSpot to track engagement and ROI for your campaigns.
After connecting these accounts, you can create your first campaign in the Campaigns section. Under Marketing > Campaigns, create a new campaign. Include your landing pages, emails, and social posts. Which HubSpot will track in a single dashboard for easy monitoring of campaign performance.
8. Reporting and Optimization
As your campaigns run, monitor their performance with HubSpot’s reporting tools. Go to Reports > Custom Reports, Create visual reports that capture metrics aligned with your goals, such as lead sources, email engagement rates, or sales conversions.
Regularly reviewing this data allows you to make informed adjustments to your strategy. Identify high-performing areas, such as particular emails or ads, and optimize underperforming aspects. By iteratively refining your approach based on real-time data, you can enhance the effectiveness of your campaigns and drive better results.
Conclusion
Following this structured approach helps new HubSpot Marketing Hub users build a solid foundation for data-driven, targeted, and effective digital marketing campaigns that align with business objectives and foster engagement.


